Medical Imaging XR Tutorials
Start Free Trial
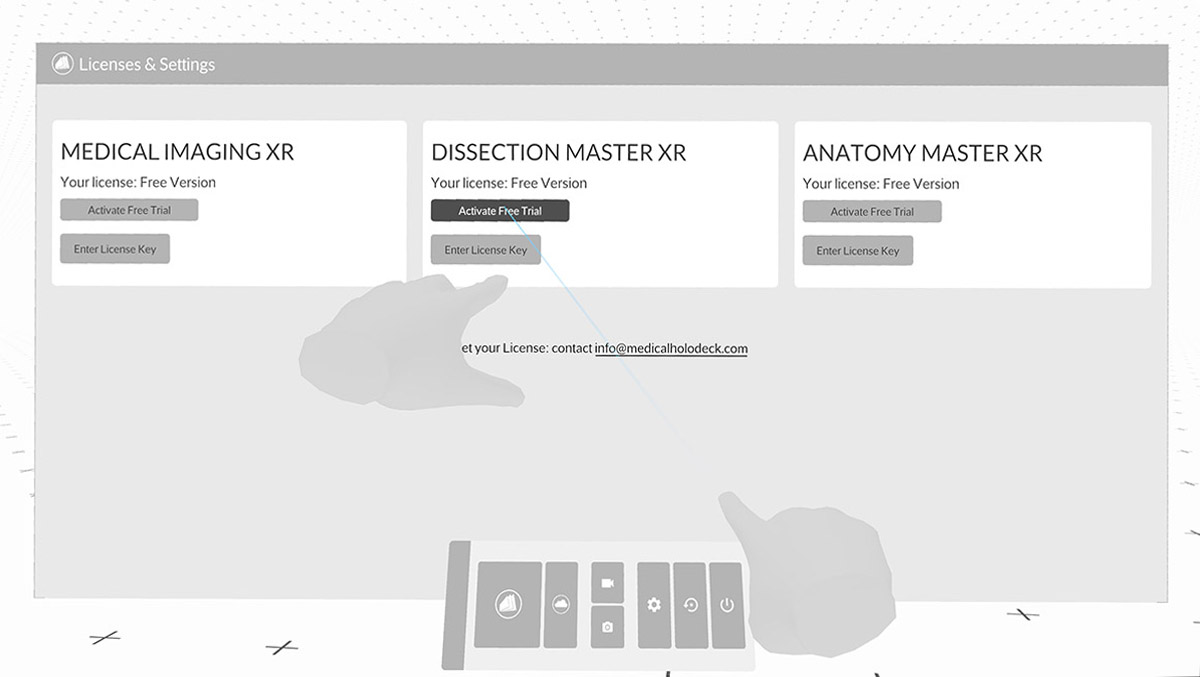 In VR, go to settings and click the 'Activate Free Trial' button.
Activating License Keys on PC VR Systems
In the following tutorial, learn how to activate the license keys on
PC VR System. Start by copying the license key to your clipboard.
Launch Medicalholodeck and go to the settings page by clicking on
the cog wheel in the main menu. Next, go to 'Licenses' tab at the
top and select 'Enter License Key'. Paste the license key by
clicking on the paste button and selecting 'Activate'.
Activating License Keys for Quest 2 Standalone VR Headsets
In the following tutorial, learn how to activate the license keys on
Quest 2 standalone VR headsets. Connect your headset to the Internet
and launch Medicalholodeck. Go to the settings page by clicking on
the cog wheel in the main menu and select 'Licenses' tab at the top.
Note your 6-digit device ID from the bottom of the screen. You will
need it for connecting your VR headset to your computer. Open a web
browser on your computer, navigate to www.medicalholodeck.com/link,
and add your headset’s device ID from the previous step. Select
'License Management’ from the menu, add your keys, and click
'Activate'.
In VR, go to settings and click the 'Activate Free Trial' button.
Activating License Keys on PC VR Systems
Discover How to Use Your Hands to Interact, Scale, and Cut Data in a Virtual Reality Environment
Use your hands to interact with data. Put your right hand into a
dataset until it's highlighted with a blue frame. Then pull the
trigger to grab and move it. To scale the data, put both hands into
a dataset until they are highlighted in blue. Then pull the triggers
on both controllers and move the hands apart to scale and rotate the
data.
To use live cut, activate the function from the control panel. A
cutter is attached to your left hand. Move your hand into a dataset
to see a live cut. You can fix the live cut plane in place by
pulling the trigger. Hit the red x button with your laser to remove
the cut.
Navigating the Apps in VR and AR
Use your right hand to navigate the user interface. Point at the
desired item with the laser and pull the trigger to select it.
The Main Control Pad and the Library Panel are located centrally
within your field of view. This serves multiple functions: it allows
you to hide and show the Library Panel, initiate or join a TeamXR
session, record movies, and RXR Files, open the Settings section on
the Library Panel, reset the scene, and quit Medicalholodeck.
The Library Panel is organized into four sections. On the left,
you'll find the Medical Imaging XR section. In the middle are the
Dissection Master XR section and Anatomy Master XR section. On the
right, you have the Saved Scenes and RecordXR sections.
Upon loading a dataset from the Library, the Object Pad appears.
This pad is equipped with multiple tools to manipulate, measure,
and annotate datasets. When medical imaging is loaded, the Medical
Imaging XR Panel becomes visible. This panel is used to set tissue
filtering and windowing for DICOMs. For detailed instructions on
how to use it, please refer to the
Tissue Filtering tutorial.
When working with Dissection Master XR or Anatomy Master XR
datasets, dedicated panels become available. The Dissection Master
XR Panel allows you to select layers of the active model and
toggle annotations of the structures on and off. On the other
hand, the Anatomy Master XR Panel presents a hierarchy of
anatomical structures. This panel enables you to selectively
display or hide specific organs and adjust their opacity.
Library & Main Menu
 1. Medical Imaging XR data
1a. Import your own data (DICOM, OBJ, STL)
2. Dissection Master XR data
3. Anatomy Master XR data
4. Your saved scenes
4a. Save a scene
5. Move the library
6. Show and hide the Library
7. App Settings (licensing etc.)
8. Screenshot function, also available on your controller button
9. Capture video
10. Reset
11. Quit Main Panel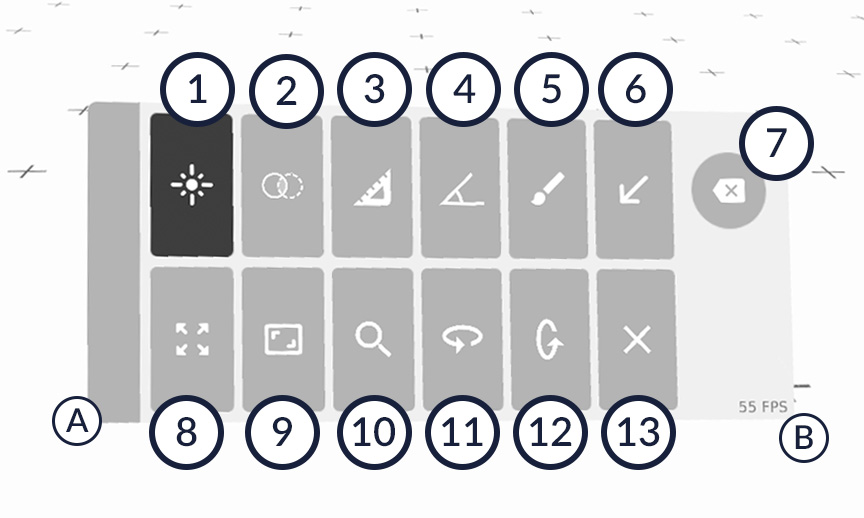 1. Laser
2. Masking and segmentation tool for DICOM
3. Measure distances
4. Measure angles
5. Free line drawing
6. Place markers
7. Delete measurements, angles, drawings and markers
8. Move active dataset
9. Scale active dataset
10. Zoom active dataset
11. Rotate active dataset horizontally
12. Rotate active dataset vertically
13. Remove active dataset
A. Move UI panel with laser. To fix position again, drag it closely to your body.
B. Your frame rate, FPS
Medical Imaging XR User Interface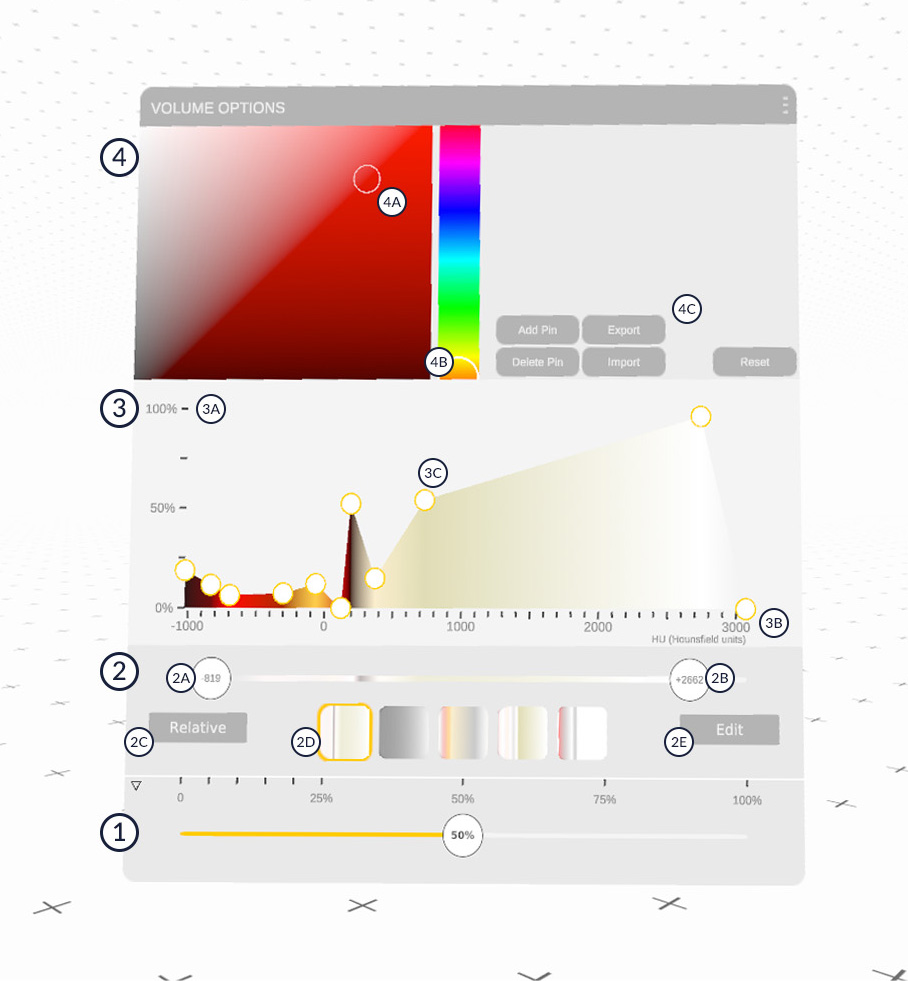 1. Set displayed DICOM quality
2. Tissue filter settings
2A. Lower Hounsfield Unit (HU) button
2B. Upper Hounsfield Unit (HU) button
2C. Switch between relative and absolute color values
2D. Color presets
2E. Edit a color preset
3. Color values
3A. Transparency
3B. Hounsfield Units HU
3C. Color pins
4. Edit colors
4A. Color picker
4B. Hue picker
4C. Add or delete a color pin.
1. Medical Imaging XR data1a. Import your own data (DICOM, OBJ, STL)
2. Dissection Master XR data
3. Anatomy Master XR data
4. Your saved scenes
4a. Save a scene
5. Move the library
6. Show and hide the Library
7. App Settings (licensing etc.)
8. Screenshot function, also available on your controller button
9. Capture video
10. Reset
11. Quit Main Panel
1. Laser 2. Masking and segmentation tool for DICOM
3. Measure distances
4. Measure angles
5. Free line drawing
6. Place markers
7. Delete measurements, angles, drawings and markers
8. Move active dataset
9. Scale active dataset
10. Zoom active dataset
11. Rotate active dataset horizontally
12. Rotate active dataset vertically
13. Remove active dataset
A. Move UI panel with laser. To fix position again, drag it closely to your body.
B. Your frame rate, FPS
Medical Imaging XR User Interface
1. Set displayed DICOM quality2. Tissue filter settings
2A. Lower Hounsfield Unit (HU) button
2B. Upper Hounsfield Unit (HU) button
2C. Switch between relative and absolute color values
2D. Color presets
2E. Edit a color preset
3. Color values
3A. Transparency
3B. Hounsfield Units HU
3C. Color pins
4. Edit colors
4A. Color picker
4B. Hue picker
4C. Add or delete a color pin.
Importing Data on PC VR Systems: Importing DICOM, STL, OBJ, PDF, JPG, and MP4 and Other Media
To import a file, launch Medicalholodeck and click on the '+' button
on the top left of the Library Panel. Use the file explorer to
navigate to your data. Medicalholodeck supports multiple file
formats, including DICOM, STL, OBJ, PDF, JPG, and MP4 files. Select
the file or the whole folder by clicking on it, and then click the
'Select' button at the bottom.
Medicalholodeck will analyze the folder and display all the
compatible data for review. You can select and import multiple files
at once.
When you've made your selections, click the 'Import' button at the
bottom of the screen. This will load your chosen data into the
Library. Your selected data has been successfully imported and is
ready for use.
Display DICOM
To display a DICOM dataset select it with the laser from the
library. The data will load in front of you. Grab it with your hands
or the laser.
You can display several DICOM datasets side by side.
Display Multiple DICOM Datasets
You can load a DICOM dataset several times and compare them side by
side. The active dataset is marked with a blue circle on the floor.
Changes will appear only on the activated dataset.
To activate another dataset, grab it with your hands or trigger it
with the laser.
Importing Data on Standalone Devices (Quest 3, Pro, 2 etc.): Importing DICOM, RXR, STL, OBJ, PDF, JPG, and MP4 and Other Media
To import a file, launch Medicalholodeck and click the '+' button on
the top left of the Library Panel. Next, go to the 'Cloud' tab and
note your 6-digit device ID from the bottom of the screen, you will
need it for connecting your VR headset to your computer.
Open a web browser on your computer, navigate to
www.medicalholodeck.com/link, and add your headset’s device ID from
the previous step. Select 'Upload' from the menu. An upload box will
appear, ready to receive the files to import. Medicalholodeck
supports various file formats, including DICOM, STL, OBJ, PDF, JPG,
and MP4. Drag and drop the files onto the upload box. Wait until
upload is finished.
Then put on your VR headset. In Medicalholodeck, select the files
you want to add to the Library and click the 'Import' button at the
bottom. Your files will now be available in Medicalholodeck Library,
ready for work.
The Medical Imaging XR Panel: Windowing, Presets, Colors and Mesh Generator
Once you have loaded your DICOM dataset from the Library into VR,
the Medical Imaging XR Panel will appear. This panel is your control
center for customizing the display of DICOM data.
The Color Section is located at the top. Adjust the transparency and assign colors to specific Hounsfield Units (HU) using Color Pins. The transparency is adjustable from 0% to 100%. Modify these values by moving the Color Pins vertically. Hounsfield Units (HU) allow you to filter DICOM data based on radiodensity. Moving the Color Pins horizontally will assign specific colors to specific HU values. Use the Color and Hue Pickers located on the right side to change the color of each pin. The Preset Section is located on the left side of the panel. Medicalholodeck provides several built-in color presets. To edit a preset, move the existing color pins or add new ones until the desired tissues are visible. To save the current settings, click the "+" button at the top of the Preset Section. This will create a new custom preset. Next, there is the Tissue Filter Section. This section includes the Lower and Upper Hounsfield Unit (HU) buttons. Move these buttons to window DICOM data until the desired body tissue is visible. You also have the option to switch between Relative and Absolute Color Values. In absolute mode, colors are fixed to specific Hounsfield Units (HU). This means that when you limit the HU range using the Lower and Upper HU buttons, you also limit the visibility of colors associated with those HU values. On the other hand, in relative mode, colors are not directly tied to specific HU values. Instead, they are relative to the current HU window. This means that when you adjust the HU range, the full spectrum of colors will still be visible within the new window, regardless of how narrow it might be. This allows more flexibility in visualizing different tissue types within a specific HU range. Below the Tissue Filter Section, you will find the Mesh Generator Section. This feature allows you to generate a 3D mesh from your DICOM data, which can be used to create 3D models for printing or further analysis. Find a tutorial for mesh generating here. Next, we have the Edge Filter Section. This feature is used to enhance the visibility of transitions between different tissue densities in your DICOM data. Filtering based on tissue homogeneity allows clearer differentiation between structures. When the filter is adjusted towards the left, it focuses on more homogeneous tissue. As you move the filter towards the right, it increasingly highlights areas where there is a rapid change in tissue density, such as transitions from soft to dense tissue. This makes it easier to distinguish between different structures in your dataset. In the Quality Section, you can adjust the displayed quality of the DICOM data. This tool allows you to fine-tune the balance between the visual quality of your DICOM data and the application's performance. By adjusting this setting, you can optimize the display of your data to match the capabilities of your computer. Whether you prioritize high-resolution imagery or smoother performance, this function allows you to customize your experience to your needs.
The Color Section is located at the top. Adjust the transparency and assign colors to specific Hounsfield Units (HU) using Color Pins. The transparency is adjustable from 0% to 100%. Modify these values by moving the Color Pins vertically. Hounsfield Units (HU) allow you to filter DICOM data based on radiodensity. Moving the Color Pins horizontally will assign specific colors to specific HU values. Use the Color and Hue Pickers located on the right side to change the color of each pin. The Preset Section is located on the left side of the panel. Medicalholodeck provides several built-in color presets. To edit a preset, move the existing color pins or add new ones until the desired tissues are visible. To save the current settings, click the "+" button at the top of the Preset Section. This will create a new custom preset. Next, there is the Tissue Filter Section. This section includes the Lower and Upper Hounsfield Unit (HU) buttons. Move these buttons to window DICOM data until the desired body tissue is visible. You also have the option to switch between Relative and Absolute Color Values. In absolute mode, colors are fixed to specific Hounsfield Units (HU). This means that when you limit the HU range using the Lower and Upper HU buttons, you also limit the visibility of colors associated with those HU values. On the other hand, in relative mode, colors are not directly tied to specific HU values. Instead, they are relative to the current HU window. This means that when you adjust the HU range, the full spectrum of colors will still be visible within the new window, regardless of how narrow it might be. This allows more flexibility in visualizing different tissue types within a specific HU range. Below the Tissue Filter Section, you will find the Mesh Generator Section. This feature allows you to generate a 3D mesh from your DICOM data, which can be used to create 3D models for printing or further analysis. Find a tutorial for mesh generating here. Next, we have the Edge Filter Section. This feature is used to enhance the visibility of transitions between different tissue densities in your DICOM data. Filtering based on tissue homogeneity allows clearer differentiation between structures. When the filter is adjusted towards the left, it focuses on more homogeneous tissue. As you move the filter towards the right, it increasingly highlights areas where there is a rapid change in tissue density, such as transitions from soft to dense tissue. This makes it easier to distinguish between different structures in your dataset. In the Quality Section, you can adjust the displayed quality of the DICOM data. This tool allows you to fine-tune the balance between the visual quality of your DICOM data and the application's performance. By adjusting this setting, you can optimize the display of your data to match the capabilities of your computer. Whether you prioritize high-resolution imagery or smoother performance, this function allows you to customize your experience to your needs.
Use tools for measuring, marking and drawing in virtual reality. The measurements, markers and drawings are connected to the active dataset and will move and scale with it.
They can be removed with the delete tool on your Panel.
Measuring Distances in Virtual Reality: Precise Spatial Measurements in Medicalholodeck
To measure distances, select the measurement tool from the Control
Panel. Move the black cone on your fingertip to the first position.
Press the trigger to fix the first point, move the cone to the
endpoint, and press the trigger again. The distance measure between
the two points will be displayed in millimeters.
Select the delete function from the Control Panel to delete a
measurement, move the delete icon on your fingertip to the
measurement, and press the trigger.
How to Place and Remove Markers: Highlighting and Removing Key Points in VR
Highlight important areas in a DICOM with arrow-shaped markers.
Select the marker function from the control panel, and an arrow will
appear on your fingertip. Move it to the field of interest in your
data set and press the trigger.
Select the delete function from the control panel to delete a
marker, move the delete icon on your fingertip to the marker, and
press the trigger. The marker will disappear.
Free Line Drawing in Virtual Environment
Use the drawing tool for free line drawing in VR. Select the tool
from the Object Pad. Customize the thickness and color of lines. Use
the provided Slider to increase or decrease the thickness, and
select your favored Color on the Color Buttons.
After adjusting settings, hold the trigger on your right controller
to initiate drawing. While holding the trigger, move your hand. You
will notice lines drawn in 3D space. Experiment with different
movements and angles to create your drawings.
To stop drawing, release the trigger button. This action will stop
the creation of lines.
To delete a drawing, select the delete function from the Object Pad.
A delete tool will appear on your fingertip. Move the delete tool
over the drawing you want to remove and press the trigger button on
your controller. This action will remove the selected drawing from
the 3D environment.
Capture Screenshots
Capture screenshots and videos from inside the app. A preview of the
captured screenshot will be visible on your right hand.
Videos will capture your VR view.
Photos and videos are stored in HD format (1920x1080) on your
desktop.
When using the screenshot or video function for the first time after
starting the app it will take a few seconds until the camera is
ready.
Capture screenshots by clicking the function button on your
right controller.
Capture Videos
Capture videos by activating the video function on the
home menu UI. Stop recording by shooting with the laser on
the button a second time.